
Unlocking the detail: Mastering bitmap modes for better laser engraving
When you send a photograph or intricate artwork to your laser engraver, you’re essentially feeding it a map of pixels – a bitmap image. To translate these shades of grey into the stark reality of a laser’s on/off commands, your software employs various bitmap modes. The choice you make here dramatically impacts the final engraved detail, contrast, and smoothness.
Fundamentally, bitmap engraving modes fall into two main camps: Dithering Modes, which cleverly use patterns of dots to trick the eye into perceiving shades of grey, and Grayscale Mode, which directly manipulates the laser’s power output based on the lightness or darkness of each pixel. Let’s explore the nuances of each.
1. Greyscale: This mode operates on a direct relationship: darker pixels tell the laser to fire with more intensity or for a longer duration, resulting in deeper or darker burns. Lighter pixels receive less energy. The payoff is smooth gradients and realistic shading, making it ideal for lifelike photo engravings and materials like glass or leather that respond predictably to varying laser power. However, it demands precise power and speed calibration, can lead to inconsistent burns on materials like wood, and tends to be slower than dithering.
2. Jarvis Dithering: A more sophisticated approach, Jarvis employs an “error-diffusion” algorithm. It analyses the error created when converting a pixel to black or white and strategically distributes that error to neighboring pixels. The result is a natural-looking texture with a balanced tonal range and excellent detail, particularly well-suited for high-quality photo engraving on diverse materials like wood, acrylic, stone, and anodised aluminum. The trade-off is slightly longer processing times compared to simpler dithering methods.
3. Floyd–Steinberg Dithering: A veteran in the dithering world, Floyd–Steinberg also diffuses errors to adjacent pixels but focuses on a smaller set, leading to higher contrast. It offers a good compromise between detail and contrast and boasts faster processing speeds. However, its textures can appear grainier than Jarvis, and subtle gradients might not be as smooth. It’s a solid choice for wood and materials where a bit more texture is acceptable and for quicker jobs where decent detail is needed.
4. Stucki Dithering: Similar in concept to Jarvis, Stucki utilises a different error diffusion matrix, aiming for a touch more sharpness with less softening. It excels at producing crisp lines while maintaining a balanced tone, making it effective for portraits or logos where both detail and tonal accuracy are important. Be aware that it might introduce a slight edge contrast, appearing as more black pixels, and can feel a bit harsher than the smoother Jarvis.
5. Atkinson Dithering: A lighter-weight method with roots in early computer displays, Atkinson spreads error to even fewer surrounding pixels, intentionally creating a more “pixelated” or vintage aesthetic. Its pros lie in its clean and artistic effect, making it suitable for stylised engravings. However, its tonal realism is limited, and the grayscale illusion is less convincing, making it best for retro or stylised engravings, faster raster jobs, and achieving lower-resolution image effects.
6. Sierra Dithering: Offering a middle ground between Floyd–Steinberg and Jarvis, Sierra aims for smoother mid-tones while preserving sharpness through its unique error-diffusion algorithm. It can produce pleasingly smooth gradients and nice detail without the aggressive contrast of Floyd–Steinberg. However, it might appear slightly softer than Floyd–Steinberg and may require a bit more experimentation to dial in the optimal settings for different materials like wood and leather.
7. Bayer Dithering (Ordered Dithering): Unlike the error-diffusion methods, Bayer employs a fixed matrix to convert grayscale to black and white, resulting in a predictable, repeating dot pattern. Its primary advantages are very fast processing and consistent patterns. However, it can produce noticeable grid artifacts and lacks the smoothness of error diffusion techniques. It’s best reserved for stylised or decorative engraving or situations where speed and pattern consistency outweigh realism.
The selection of the appropriate bitmap mode is a critical step in achieving successful laser engravings of photos and complex images. For realistic results on materials like wood, Jarvis or Grayscale often shine.
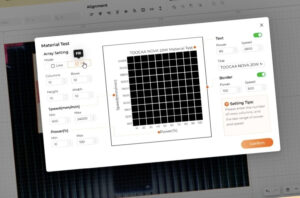
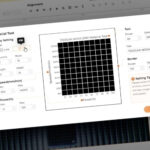
For faster jobs or artistic flair, Atkinson or Bayer might be your go-to. The golden rule, as many experienced engravers will tell you, is to test, test, test. Every material reacts uniquely to laser parameters, and factors like lighting, surface texture, and image resolution all play a role in the final outcome. Many software packages, like XCS, even offer tools to create your own bitmap test arrays, empowering you to “be professional” and discover the optimal settings for each project.
Related Posts